I’m going behind the scenes again to dive deeper into blog accounting. A couple weeks ago I started the journey to jump from spreadsheet expense tracking to actual small business accounting software by reviewing affordable blog accounting apps. Since then, I chose Wave (free) and have been customizing the setup to make it friendly for our blog tracking.

How do you know if the time is right for your own blog tracking? Follow this infographic:
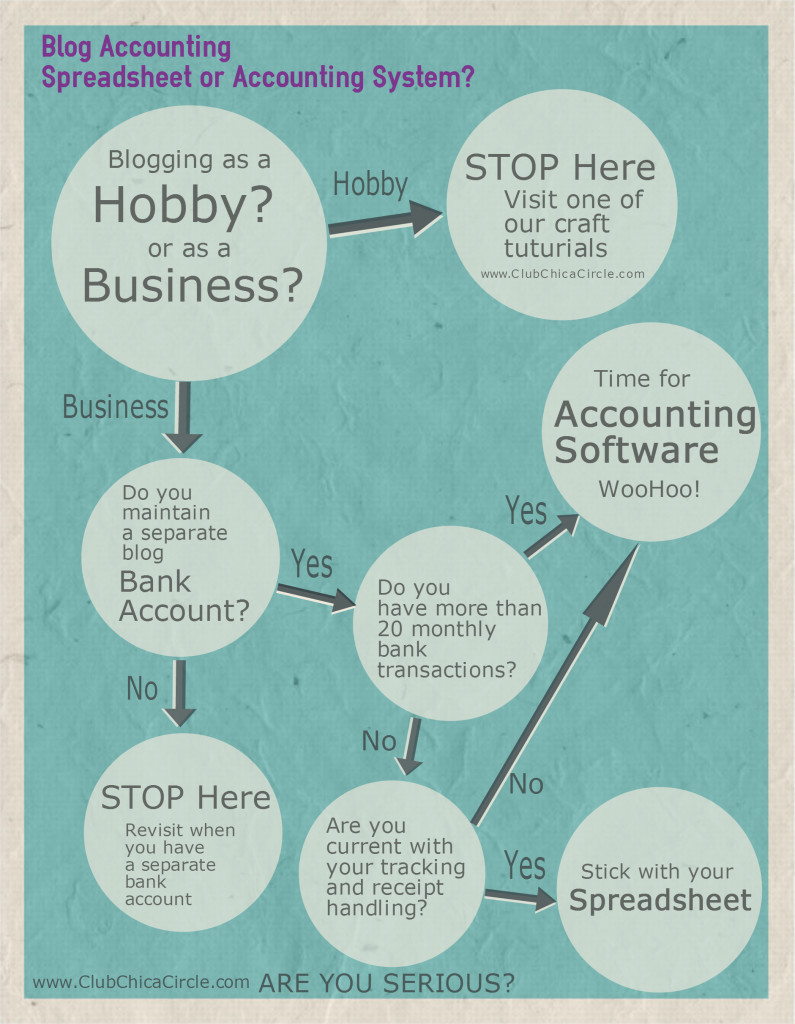
If you are not snoozing by this time – follow along on our journey. I am on a mission to get our blog foundation stabilized so we are ready for autopilot accounting (or at least avoid freak-out moments when tax time arrives).
Even though my step-by-step is showing examples using Wave – the steps can apply to any of the tools I reviewed in my previous blog accounting post.
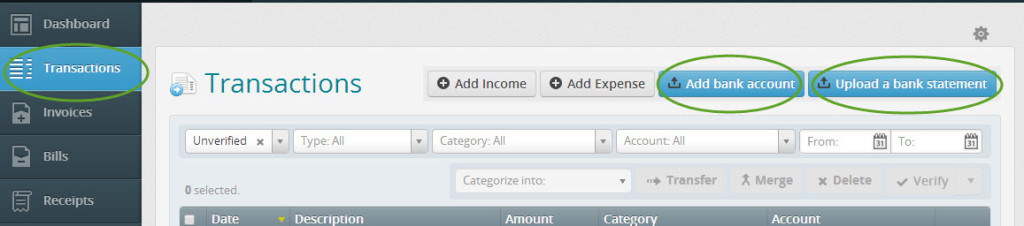
Step 1: Import the bank activity
This was the easiest step as Wave has a look-up feature that allows you to select your bank and then log in to pull the data. Most banks only transfer 3 months of data. To pull in older data, download a specific date range from your bank site and then upload the data.
Step 2: Customize your income accounts
When it is time to classify all of the expenses and income into different buckets, you can use the default accounts, but I chose to customize to match our blog as a business activities.
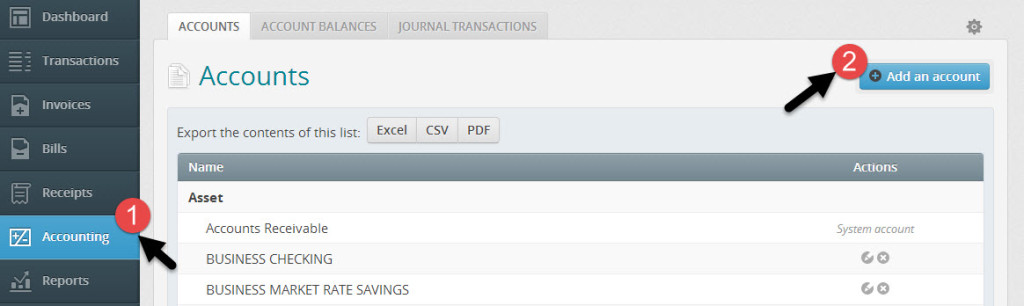
Within the ‘Accounting’ section, you will find a button to ‘Add an account’:
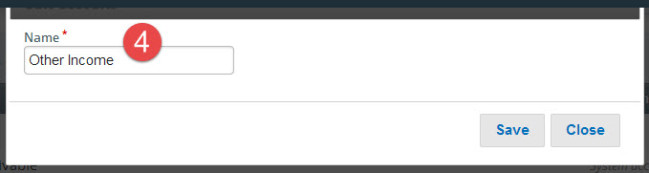
- Select the ‘Accounting’ menu
- Select ‘Add an account’
- Select the section you want to customize (I started with ‘Income’)
- Choose any of the accounts within the section (you can activate an account name from a long list or choose any account and rename it)
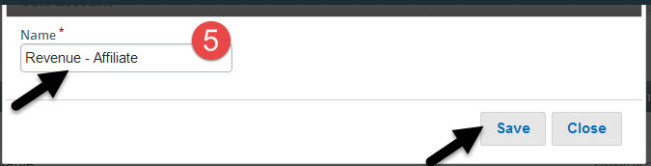
- Rename the account to match the activity you want to track (and remember to ‘Save’)
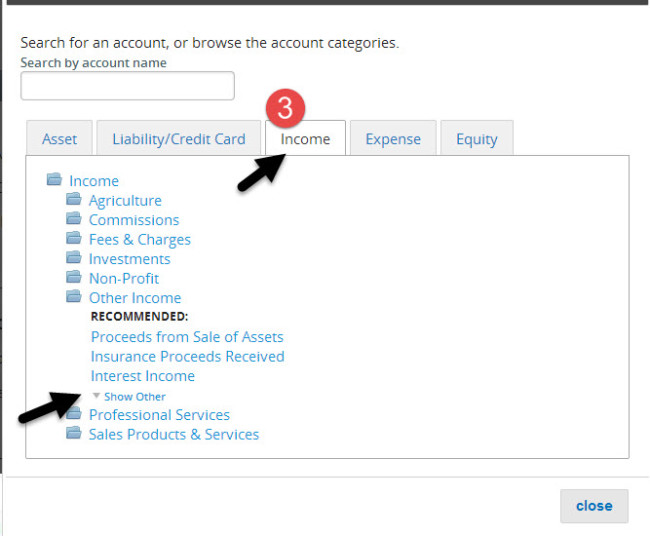
The prepopulated list of account names is extensive – you can chose any account to rename based on blog-specific activities.
I renamed an income account to ‘Revenue – Affiliate’ to specifically track affiliate income.
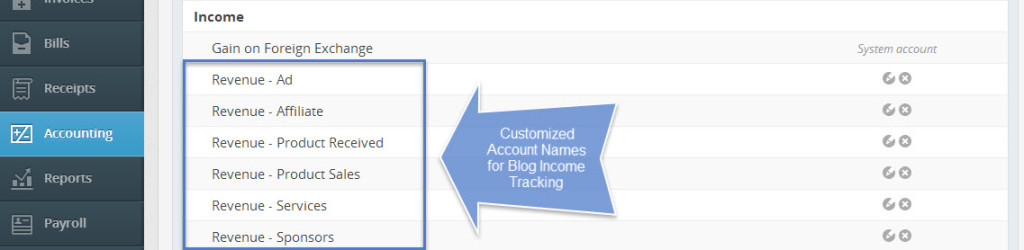
For income accounts – I added the following:
- Revenue – Ad (e.g. Google AdSense)
- Revenue – Affiliate (e.g. Amazon affiliate or Pick Your Plum)
- Revenue – Product Received (e.g. the value of product received at wholesale value)
- Revenue – Product Sales (e.g. Etsy sales)
- Revenue – Services (e.g. craft or party planning consulting)
- Revenue – Sponsors (e.g. income from sponsored posts)
Step 3: Customize your cost of income accounts
Do you know how much it costs to produce all of the blog content that generates traffic (which leads to income through ads and sponsors)? We have been tracking all of our expenses, but not specifically for the blog production activities which tie to the revenue (until now). Within the expenses section of the accounts, there is a specific sub-section for ‘Cost of Goods’ – which can be customized for any expenses specifically tied to generating the revenue.
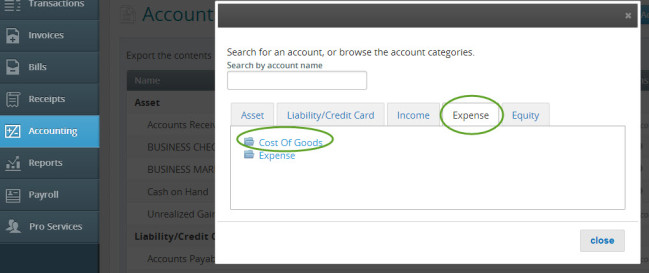
To keep it simple, I added two accounts to track:
- Cost of Revenue – Product
- Cost of Revenue – Supplies
The ‘Cost of Revenue – Product’ is specific to the cost of materials and shipping for any physical products sold. This is important to track inventory purchases tied to sales (which is a specific line item submission for income tax filings).
The ‘Cost of Revenue – Supplies’ is more relevant for our business planning. Are we spending more on blog supplies than we are earning in revenue? Now we will be able to answer that question. Supply expenses include all of our purchases at Michaels, Jo-Ann and Home Depot for items used in the craft and DIY posts. For tax-time, these expenses will be included in the other itemized expenses as supplies. The cost of sponsored events could also be included here.
Step 4: Customize your other expense accounts
For this activity, my goal was to match as closely as possible to our annual income tax expense categories. The default accounts in Wave already have most of the accounts active. The categories we will actively track for expense management include:
- Accounting Fees
- Advertising & Promotion
- Bank Service Charges
- Computer – Hardware
- Computer – Hosting
- Computer – Software
- Conferences & Meetings
- Contract Services
- Education & Training
- Insurance – General Liability
- Legal Fees
- Meals and Entertainment
- Office Supplies
- Postage and Delivery
- Small Tools and Equipment
- Travel Expense
Now that we are set up – I am ready to categorize the expenses. Stay tuned for the next installment where we input pending income items and scan receipts. Let me know if you have any questions along the way.
Disclaimer: I am not currently a licensed or practicing accountant (but I do have my CPA certificate and Accounting degree in hand). The overview above is following our journey as I set up our accounting systems to scale with our activities. Consult with your accountant if you are unsure how to proceed.


