If you saw yesterday’s post, you saw my tween’s modern masterpieces that she painted on our weekend art day. She used a crafty painting technique using painter’s tape. I was finishing up paintings for an art show I am in with 6 other artists at the Schomburg Gallery in Santa Monica, CA. and I was using a cool crafty technique of photo transfer onto canvas which combines a painted canvas with my photography.
I love to paint flowers as well as take pictures of them as a hobby. I love this technique where I can combine both. And the best part is, I am showing you how you can do it too. My tween loved to help with the “reveal” step. The theme of the show is “Beyond the Garden”, so I wanted to flowers in a new way, with closeup photography and really focusing on some of the small details by blowing them up in size onto the canvas so that you almost have to wonder what you are looking art. This photo transfer technique could work with an type of photography. I would love to see how this would translate using a pretty portrait or family photo.
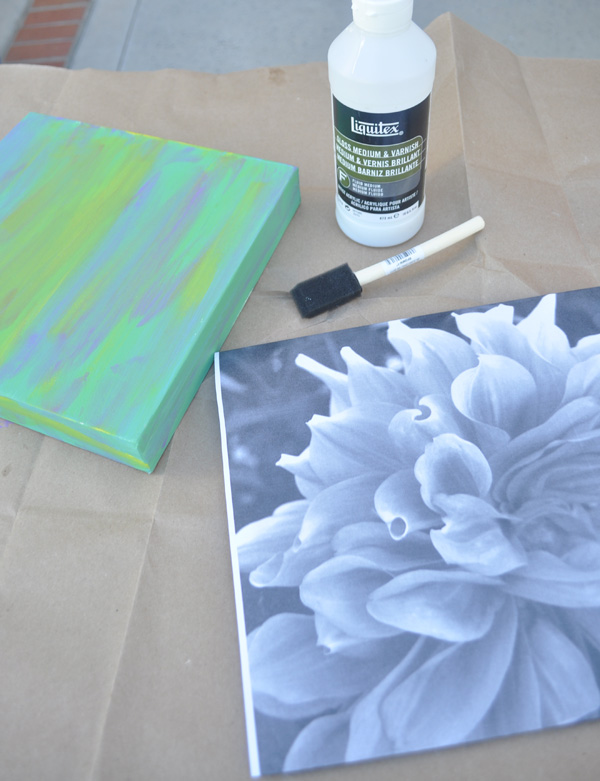
What you need to get started is a canvas that you wish to transfer your photo onto. Canvas panels like these might be a good choice if you are doing more than one, and they are inexpensive enough that you and your tween can happily have an art day without breaking the bank. I painted my canvas with a variety of colors to get a modern surreal feel, but you can keep you canvas white, paint it a solid, or try your own color blending technique on your canvas to start. I used acrylic paints as well.
Then you need copies of the photos you want to transfer. The key here is that you need to use photocopies, NOT inkjet printouts. So what I did is printout my photos at home, and then I took them to my local Fedex/Kinkos and blew them up in size on their self-serve black and white copier. I wanted to make sure my photo was bigger than the canvas that I was using so that it went from edge to edge, so I copied them onto tabloid size paper.
The last thing you will need is some Liquetex gloss medium and varnish. This is what transfers the photo onto another surface. and a sponge brush to apply.
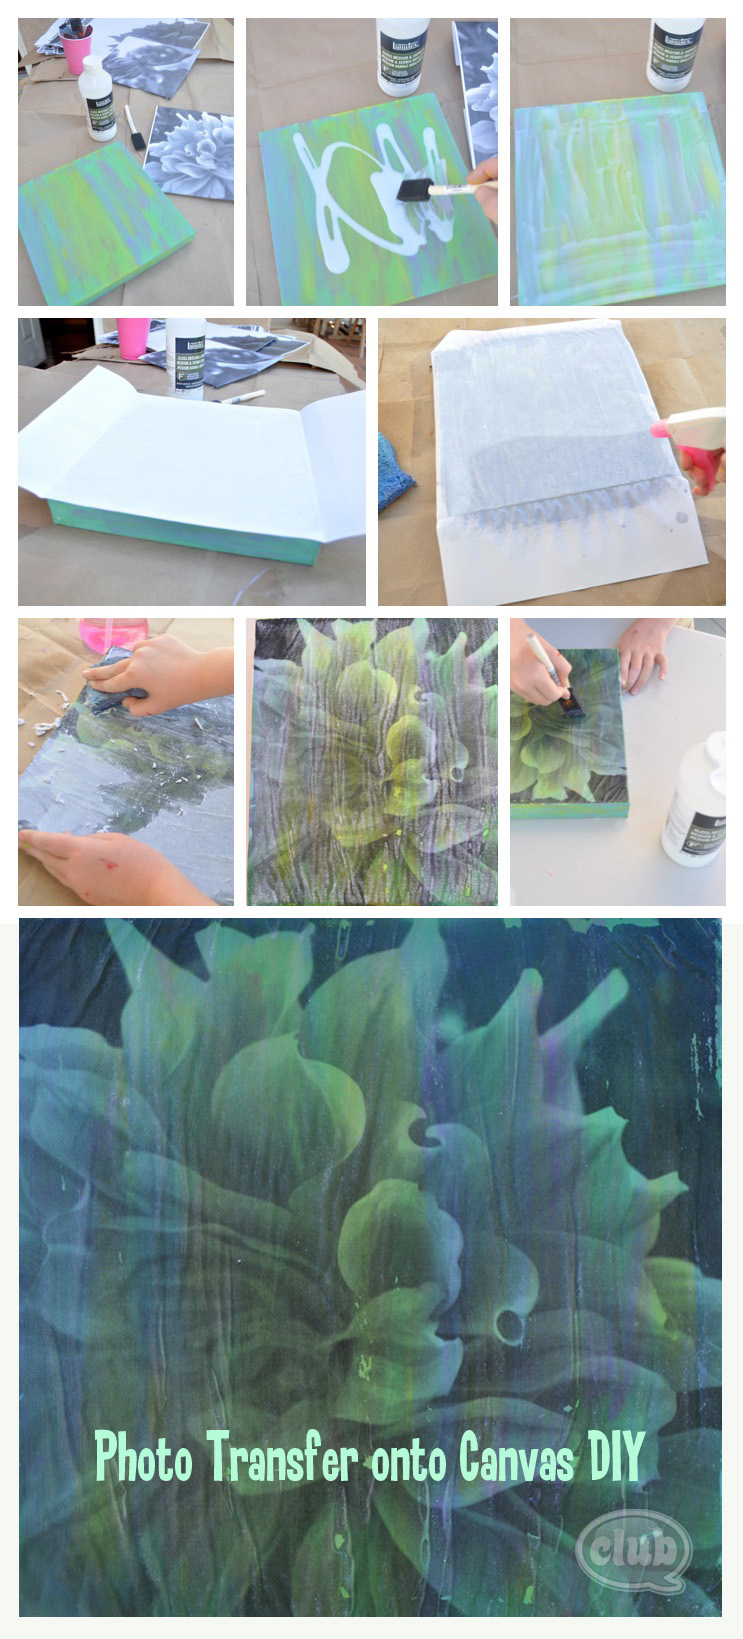
Here is a quick photo tutorial of how I created my photo transfer onto canvas art pieces:
- I started with my painted canvas in a blue and green palette of colors. I also had a blown up photocopy of a picture I took of a dahlia. The painted canvas was completely dry with no wet paint.
- Next I squirted a little Liquetex medium and varnish on top and applied an even layer along the whole front of the canvas.
- The layer of medium on the canvas should not be too thin. Make sure it has enough to soak up your image.
- Then carefully place your photocopy (I played with the placement before put the medium on and folded the edges to give me a guide of where to place the photocopy) on top of canvas coated with medium face down. Keep in mind the your image will be a REVERSE image of the photocopy. As the gel medium dries with the photocopy, the ink from the photo transfers onto the gel medium. Rub your photocopy along the top to make sure all surfaces are touching the gel medium. Here is the hard part. WAIT. Wait until the gel medium has completely dried before trying to take off. We did this example on a sunny day, and we left it outside in the sun for a couple hours so it dried pretty quickly. But I have let other paintings set up and dry overnight.
- Now comes the fun part. When the paper is completely dry, use a spray bottle full of water and squirt the whole top surface of the paper adhered to the canvas. Don’t be afraid to soak it.
- Now scrub off the paper layer. The water won’t permeate the medium varnish layer that now has the ink from the photocopy on it, but it will help dissolve the actual white paper layer. I like to use my hands to rub the paper off and a dry sponge.
- Keep scrubbing. As the paper dries as you are rubbing it off, you can keep squirting with water, rubbing it off with your fingers or sponge. Don’t be afraid to use some elbow grease. Get as much of the paper layer off as you can.
- Now to take that little last bit of paper “haze” off of your piece, I like to finish up with another thin fresh coat of the medium varnish. This brightens up all the colors and seals the whole image again.
- What you are left with is a beautiful art piece with movement, texture, and a one-of-a-kind randomness and rustic feel. I love how you never get the same thing twice, and the whole art piece is about what you will reveal.
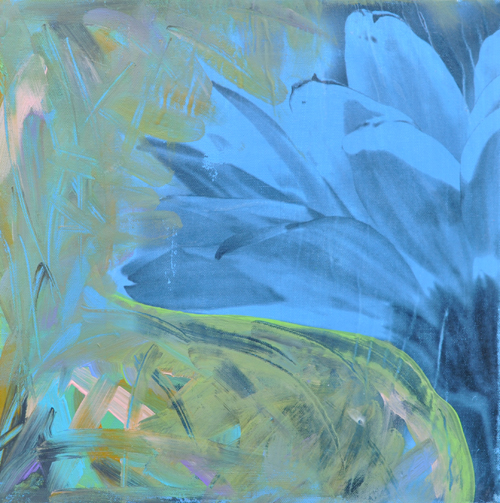
After this last step, on some of my art pieces for the show, I went in an added another layer of detail with paint to add even more depth, like this gerber daisy painting:
I hope you enjoyed the photo tutorials of our weekend art day. If you are in the Southern California area, my art show runs from Sept. 8 – Oct. 6 at the Bergamot Station in Santa Monica. I am displaying with 6 other beautiful artists. The opening reception is Sept. 8 from 3-7. I would love to see you!
Until then, hope you liked the mini art lessons, and happy crafting!
If you liked this post, and want more, you can subscribe to be on our mailing list here.


