Modern Art Wall Design DIY for the Coolest Wall Ever!

This is a Sponsored post written by me on behalf of FrogTape for SocialSpark. All opinions are 100% mine.

Tween bedroom modern art redesign before and after

Guess who just got the coolest bedroom wall EVER?

My girl!

Yep, I willingly just turned my tween’s bedroom wall into a piece of modern art.

Am I crazy?

Nope!

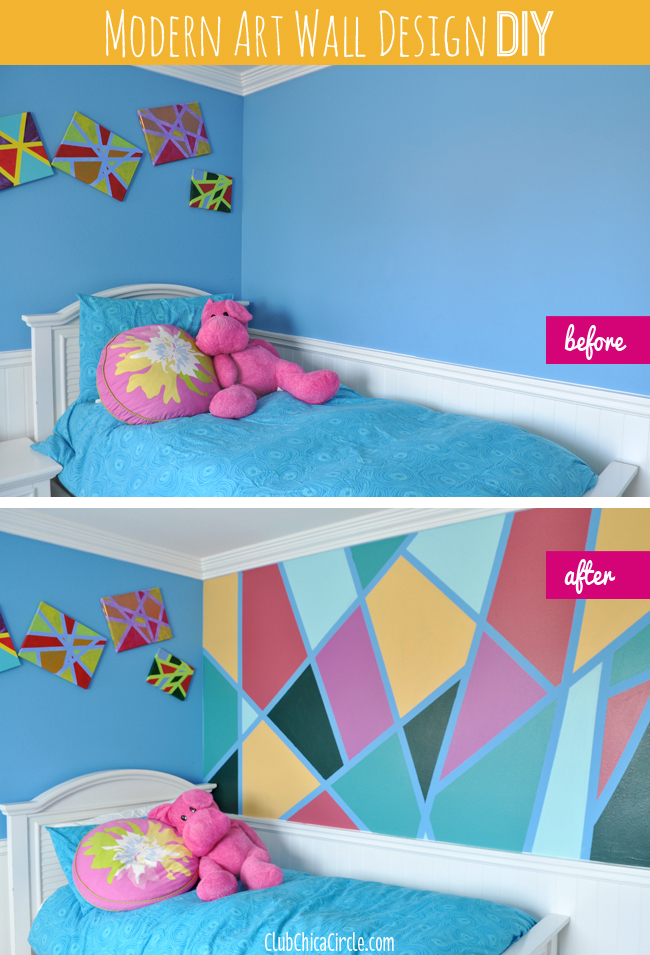
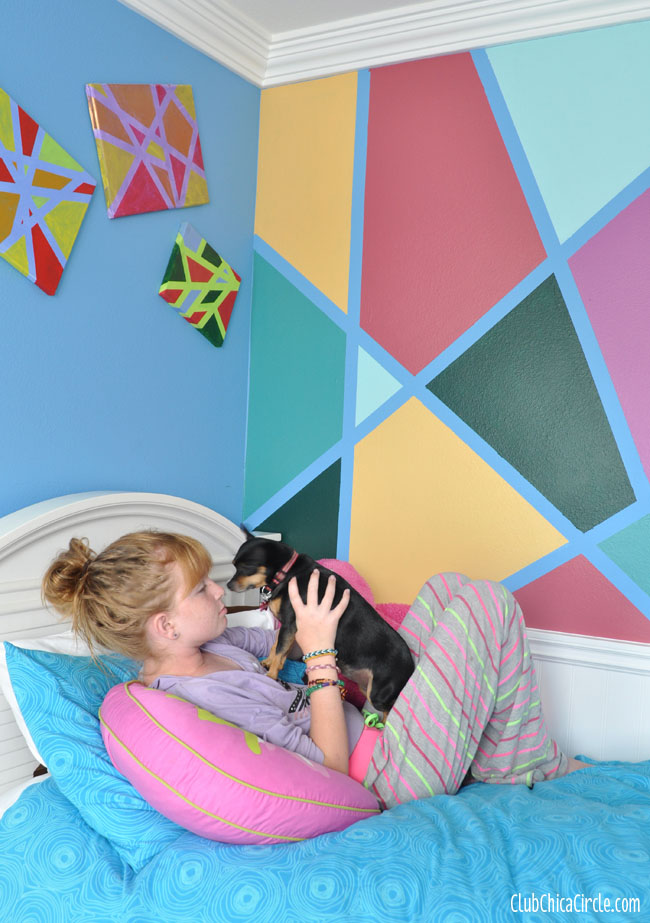
Honestly, I absolutely LOVE how this wall turned out, and most importantly, so does my daughter. This has to be one of my favorite home decor DIY projects I think we have ever done. The truth is, my girl is on the brink of being a teenager—EEK—and slowly we have been transforming and updating her bedroom to reflect her developing style. You may remember when we turned her Little People toys into cute wall hooks.

Well, this time we took on a bigger project together – her bedroom wall. And we got the inspiration from the modern art canvases we had created together years ago that are hanging on her wall now:

DIY modern art wall art for kids

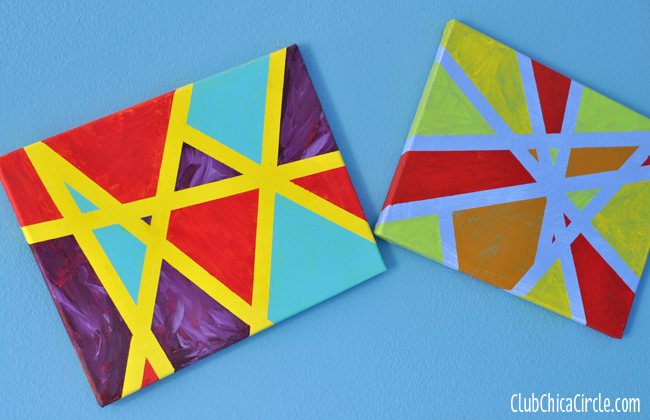
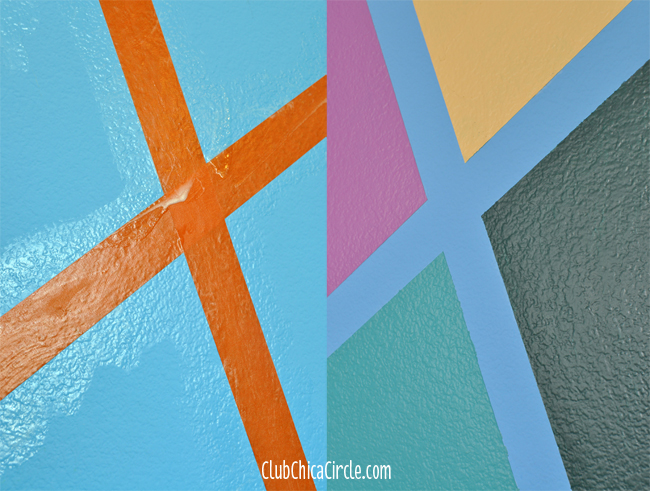
We used the same basic technique of masking off and dividing our surface into different areas with painters tape, but her bedroom wall is slightly textured and I wanted to make sure to have nice crisp lines.

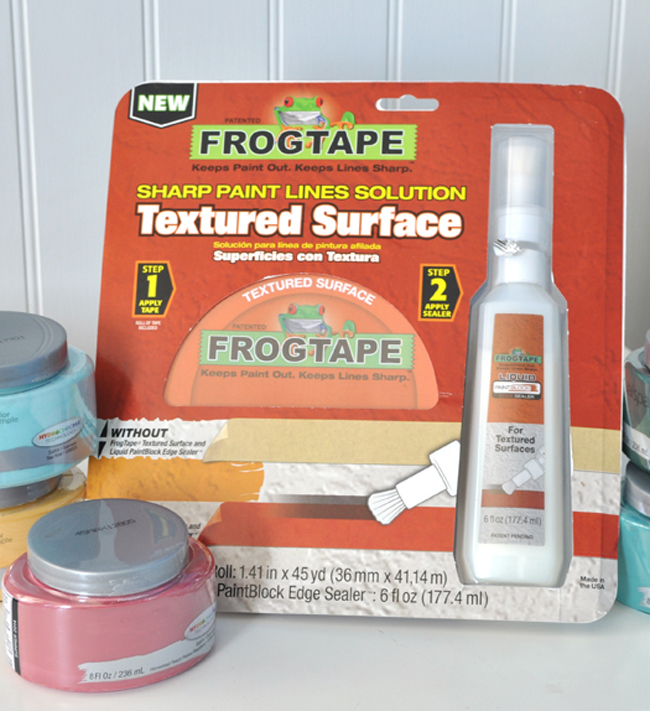
The solution—Textured Surface by FrogTape. This fabulous tape has PaintBlock® Technology, which may just make it the coolest painters tape ever.

FrogTape for Textured wall DIY project

Oh, and have I mentioned how EASY this is to do?

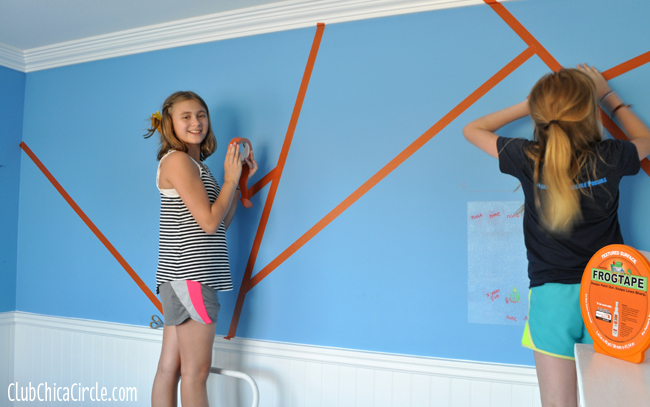
Not only did I get my daughter involved, but she invited a friend to help as well. I wanted this to feel like it was all her design.

How to make a modern art kids bedroom wall copy

And it truly was! She created this beautiful piece of modern art to fill one of her bedroom walls.

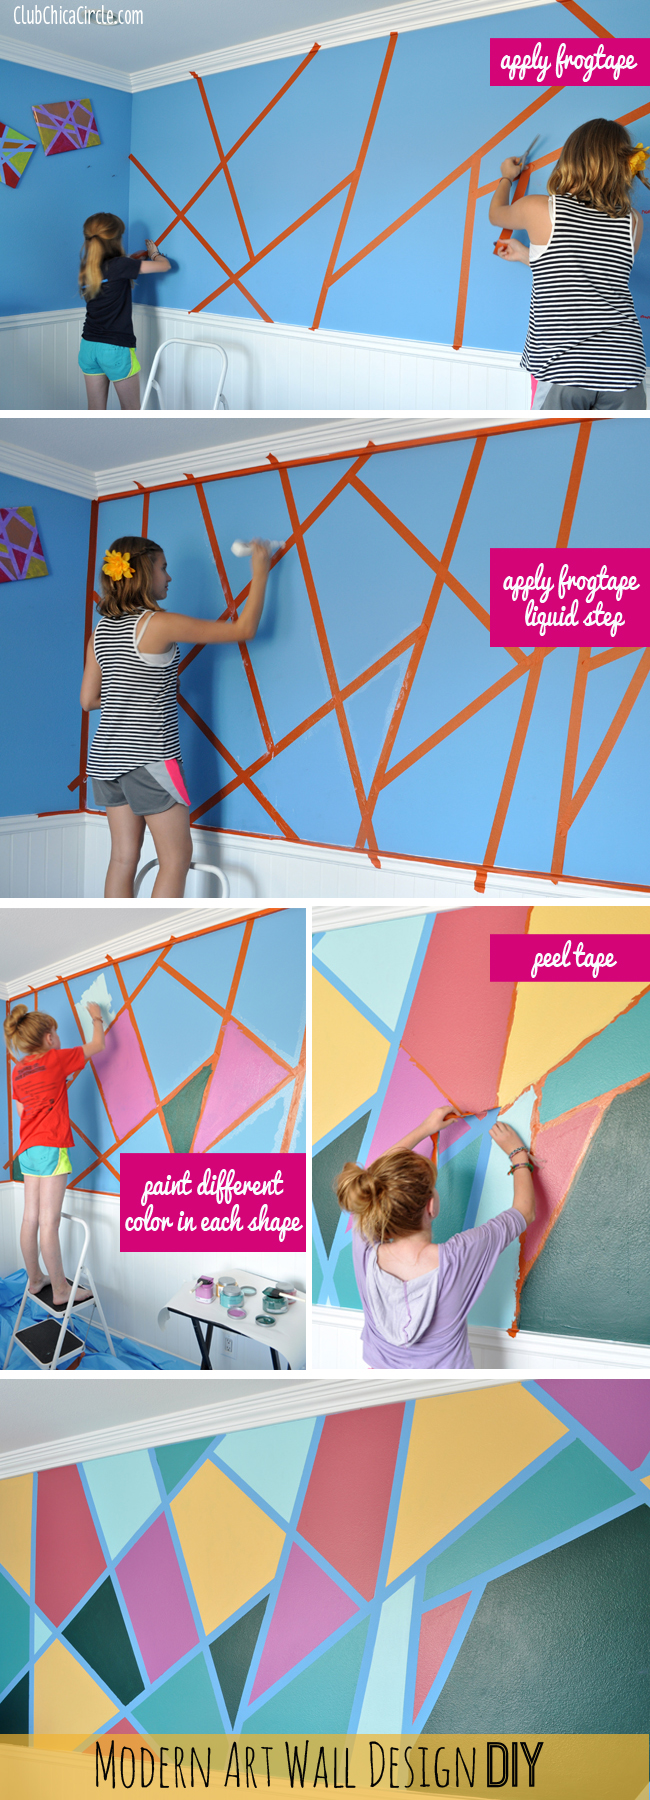
Here is how we did it:

  1. We applied strips of FrogTape in a random pattern dividing our wall into various geometric shapes.
  2. After we were happy with the design, we first rubbed all the tape lines down with a wet rag, and then applied the special FrogTape liquid on all of the seams and let dry.
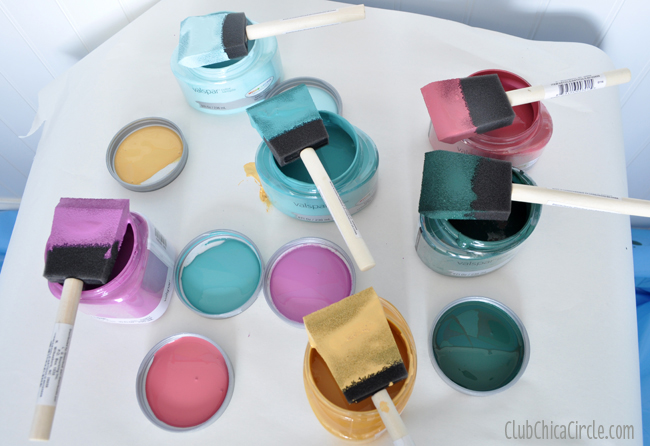
  3. Then we simply painted a different solid color in each shape in a random pattern as well.
  4. Finally, when the paint was fully dry, we peeled back the FrogTape to reveal our modern art wall.

frogTape Modern Art wall makeover DIY

We picked 6 different contrasting colors that worked together nicely – keeping in mind what the original wall color was too.

valspar paints for wall makeover

On the left is what the tape lines look like before painting, and on the right is what the reveal looks like.

FrogTape paint lines before and after

Gorgeous, right?!

Tween bedroom DIY wall design with frogtape copy

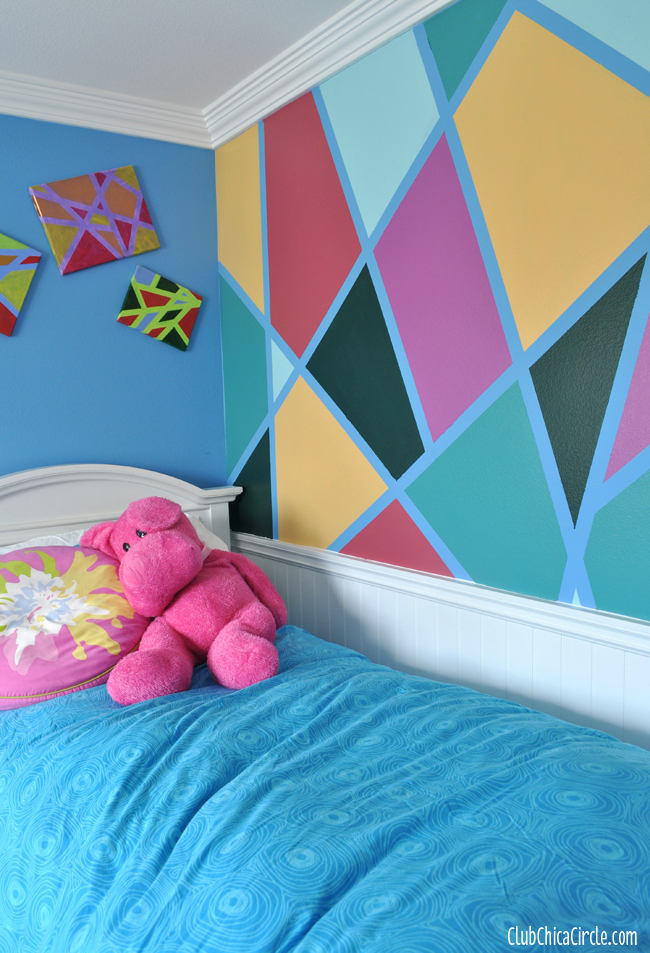
And the best part—my girl LOVES it too… almost as much as she loves her pooch. = )

cool DIY tween bedroom wall easy makeover

For more cool inspiration, follow the FrogTape Textured Surface board on Pinterest.

So, what projects would you use FrogTape® on?

pauline-sig

Visit Sponsor's Site

Pauline Molinari

I'm the crafty maven, and I'm on a mission to spread craftiness. With a fine arts degree, over 15 years experience in children's publishing, and a savvy, stylish, sassy tween daughter, I come armed with perspective and passion to inspire tween girls and their mothers to be crafty together. 

If you liked this post and want more, you can subscribe to be on our mailing list and make sure to get your free Cupcake Toppers Printables for Every Occasion.

  15 comments for “Modern Art Wall Design DIY for the Coolest Wall Ever!

  1. Sue
    August 16, 2014 at 6:02 am

    So great and love the colors you chose! What was the brand of paint you used and where can you buy it?
    Thanks for sharing!!

    • August 17, 2014 at 12:13 pm

      Thanks Sue! I found these perfect 8oz jars of sample Valspar HydraChroma technology paints in the paint section of my local Lowes store. They were the perfect size to make this cool wall with so many colors. Best thing is that they were only $2 each. I literally spent lest than $15 on paint for this project. = )

  2. August 26, 2014 at 1:04 am

    Love it, my eyes popped when I saw this. Forget the kids, I want this for my room/all over the house!

    • August 29, 2014 at 6:42 am

      I know right! I want this for my room too! Thanks for the great comment Julie.

  3. Christina
    October 13, 2014 at 7:36 am

    My daughter found this post on Pinterest and loved it. We decided to copy it in different colors for a wall in her room and were thrilled with the results! Thank you for the great idea!

    • October 13, 2014 at 11:49 am

      I love it! Thanks so much for sharing!

  4. shyla
    February 17, 2015 at 6:43 am

    Awesome! Awesome! I wanted to surprise painting my daughter’s room for her 13th b’day!
    Thank you so much for this creative idea. I want to try this..
    Perfect for teen’s!

  5. Elayne
    March 14, 2015 at 8:18 pm

    Saw the post and just did this in my 11 year olds room the tape was falling off the walls before we could finish putting up but we put sealer on and a lot of prayer and it turned out. We did bright colors and large shapes. Really happy with it. Have picture if u want to share. 😉

    • March 14, 2015 at 8:20 pm

      love it! Thanks so much for sharing! Would love to see the results! Post on our Facebook wall if you like!

  6. jordyn
    March 29, 2015 at 6:17 pm

    I love the idea What shades of colors did you use?

    • March 30, 2015 at 10:50 am

      We like bright colors, so we used some pretty bold combos, but this would work with a lighter palette too.

  7. jordyn
    March 30, 2015 at 3:00 pm

    I would love to know what the names
    of the shades of colors

  8. Ginnine
    May 25, 2016 at 1:00 pm

    Thank you so much for this beautiful wall design idea!! My husband and I did this as a feature wall in our living room and it turned out fantastic! Couldn’t be happier!

  9. Rebecca
    October 23, 2016 at 9:14 am

    Thank you for this idea. We just moved and I wanted to do something special for my seven year old. We used only two shades of lavender but let her take ownership over the project and love how it turned out.

Comments are closed.