Repurpose Flower Baskets into a Glowing Outdoor Chandelier

My family is so lucky to live in Southern California. I’m originally from the midwest, so there isn’t a day that goes by that I don’t realize how fortunate I am to be living in such a beautiful area. Being able to enjoy outdoor flowers and foliage year round is a treat. We currently have hanging flower baskets in our backyard, but after awhile they needed to be refreshed.

My super smart husband figured out that it was more cost effective to buy new hanging baskets rather than replace the the insides of them. Once I saw the empty wire frames I knew I had to make something with them. The outdoor chandelier craft was born!

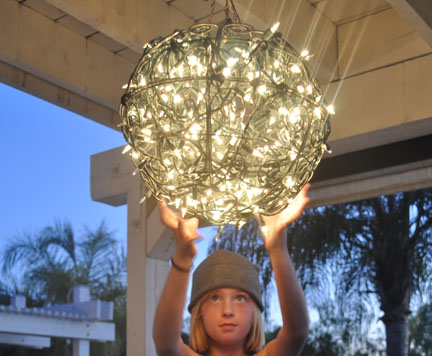
My daughter and I worked together to attach two empty wire flower baskets together with black pipe cleaners to make a globe shape. But, first we filled them with a large string of white holiday lights in the center. We used the kind that we could adjust the “twinkle” factor on the set of lights. I cut the black pipe cleaners into 3 pieces each. We secured the two baskets together, as well as the lights hanging from the top of the now globe-shaped wire frame. This allowed the twinkling lights to hang nicely throughout the frame.
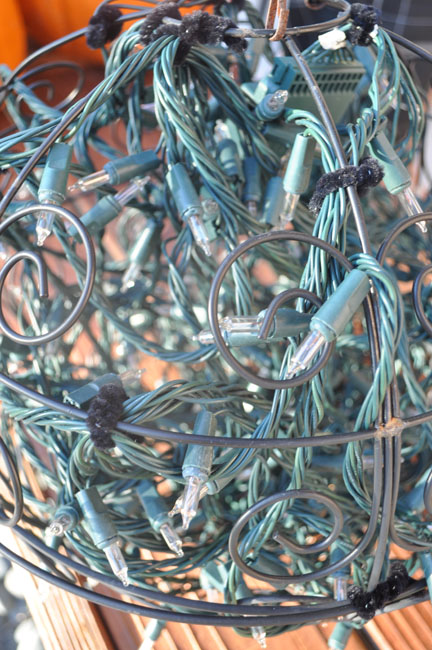
flower basket chandelier repurpose

It was that easy!

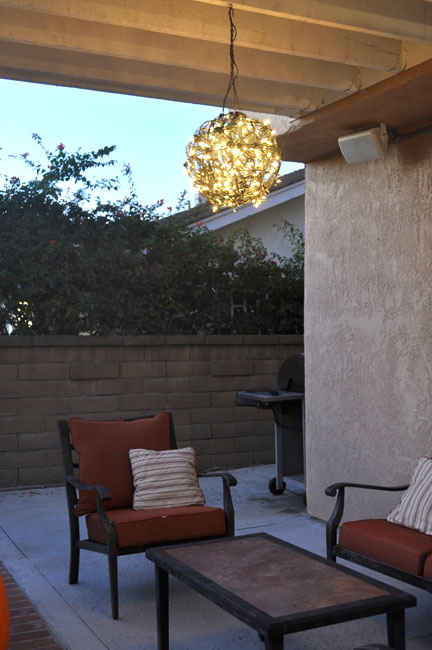
We reused one of the chain hangers from one of the baskets too, and attached it to the top of our homemade outdoor chandelier. We hung it above our outdoor patio area, and now we can enjoy it year round! Lovely!

outdoor homemade chandelier

repurpose flower basket chandelier DIY

I  love when I can re-purpose something into something beautiful!

Happy crafting!

If you liked this post, and want more, you can subscribe to be on our mailing list here.

I'm a crafty mompreneur with an affinity for pink. With a fine arts degree, over 15 years experience in children's publishing, and a savvy, stylish, sassy tween daughter, I come armed with perspective and passion to inspire tween girls and their mothers through creativity.

Tags:

14 Responses to Repurpose Flower Baskets into a Glowing Outdoor Chandelier

  1. emily on October 19, 2012 at 8:27 pm

    Oh my gosh this is a great idea! Thanks so much, you just gained yourself a daily follower!

    • Pauline Molinari on October 20, 2012 at 10:06 am

      Yay! Glad to have you! Thanks for the great comment!

  2. Julie on January 3, 2013 at 5:44 pm

    I love this! I am doing this for my barn wedding reception! Now I just need to run across a lot of these flower baskets at thrift stores. Thanks!

    • Pauline Molinari on January 3, 2013 at 6:38 pm

      Love it! great idea!!

    • Sal Eisenberg on January 6, 2013 at 8:53 am

      If you live near a big lots they normally have the flower baskets for a good price!

      • Pauline Molinari on January 6, 2013 at 11:11 am

        Good tip! I think that is where my husband purchased our new flower baskets when he realized it was more cost effective to buy new baskets altogether rather than replace the insides of them.

  3. jd on February 22, 2013 at 9:34 am

    Love this idea. Think I’m going to paint the baskets white and use white instead of green wire on the lights. Found some “warm” LED Christmas lights online that don’t have the ugly blue glow if you’re looking to conserve energy.

  4. Jess on February 23, 2013 at 7:17 am

    Just saw this on Apartment Therapy, pinning it now!
    Great idea, you are awesome!! :) Thanks for sharing!

  5. Jenn on March 6, 2013 at 9:17 pm

    Hi! I’m assuming you used an extension cord to plug in the lights?

    • Pauline Molinari on March 7, 2013 at 9:06 am

      Hi Jenn,
      Actually, I made sure to use battery operated lights so I didn’t have to try and string the lights to a plug in with an extension cord. There is a link in the post of the exact lights I ordered if you want to check it out. = )

  6. Redcandies on April 4, 2013 at 1:09 am

    I am making one (or two) of these this next week for our patio!!! LOVE!!

  7. Theresa@junk2jewels-diy.blogspot.com on April 8, 2013 at 5:19 pm

    Love this!! I have been saving mine, and had some ideas, but this is so easy and gorgeous!! thanks for sharing!!

Leave a Reply

Your email address will not be published. Required fields are marked *