Printing on Paper Bag Ideas with Free Printable

Today’s post is going to be short and sweet. I have been recovering from the flu all week, and either the cold medicines or the sinus pressure has made my head a bit fuzzy. The flu is definitely making its rounds in my daughter’s school, and thankfully she is already recovered from her bout with it. From my many hours in bed this week, I have learned a few things.

1. Watching Contagion probably isn’t a good idea for your state of mind when you are sick in bed with the flu. Good movie, but seriously disturbing in regards to getting sick.

2. Nyquil may help you sleep, but you can have some really trippy nightmare-ish dreams with it.

3. When your body aches so much that you can’t sleep, and you can’t watch one more episode of “Say Yes to the Dress“, the Pinterest app on your phone can keep you occupied.


That is exactly how I stumbled upon this handy tip, and I knew I had to try it. Did you know that you can print directly on paper bags? I would have never thought to try and feed a paper bag into my printer, but now that I have, the customizable treat bag possibilities are endless!

I had some plain white small gift bags on hand, and I found these cool red colored lunch bags at Target recently.

print on paper bag instructions

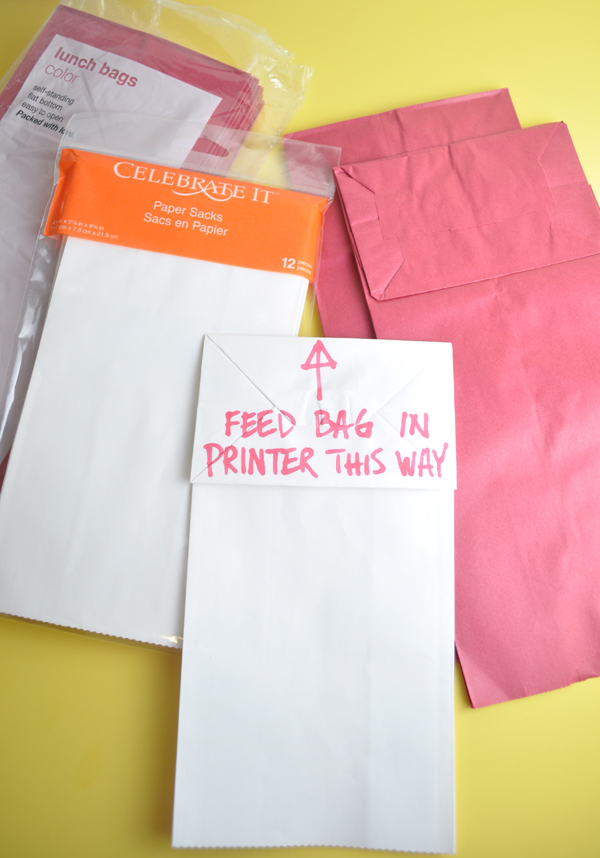
The trick to printing on a paper bag, is to create a custom printing size within your printer settings. I plugged in the exact dimensions of each bag and labeled them accordingly. I now have a “lunch bag” setting and “gift bag” setting in my printer settings.

Secondly, be sure to feed the bag in with the bottom of the bag facing up (see image above).

Finally, in your printer settings be sure to flip the orientation of your print horizontally. That way when it prints on the bag, the words and design will be right reading after you fill your bag.

One note: I found that I got a better print when I planned my design to print on the middle of the bag instead of at the bottom where it was thicker. I think because of the extra paper from the bottom of the bag, the printer liked to add some extra printer smudges on the front. As long as I planned my printer above the bottom fold, I was able to get a nice clean print on my treat bag.

Another note: Make sure to purchase bags that are uncoated, or that have no glossy coating. The ink will not dry and rub right off.

I created a couple quick bag designs that I am happy to share with all of you if you would like to try and print on your own bags. In the spirit of Valentines Day coming up, and because I somehow had this song stuck in my head, I decided on a “All You Need Is Love” theme.


Get your FREE printables here:

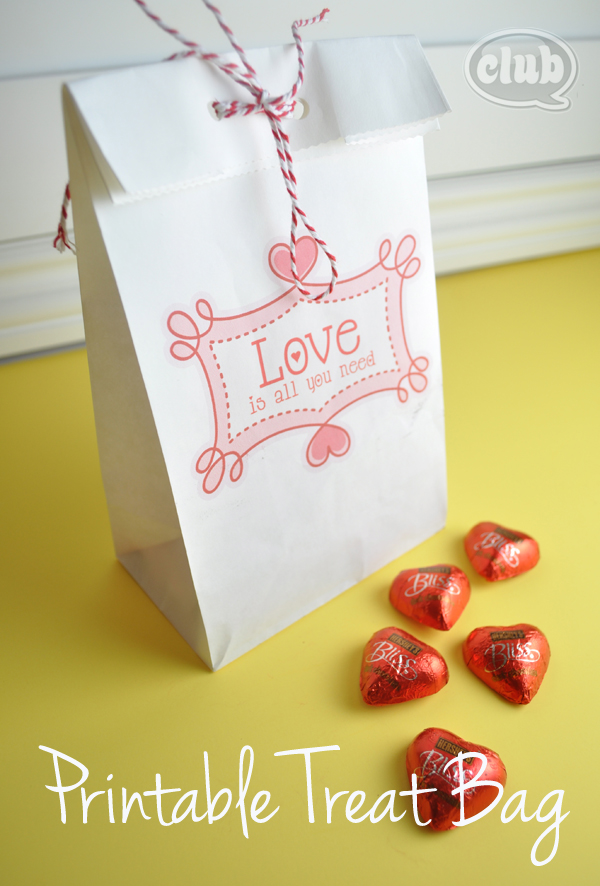
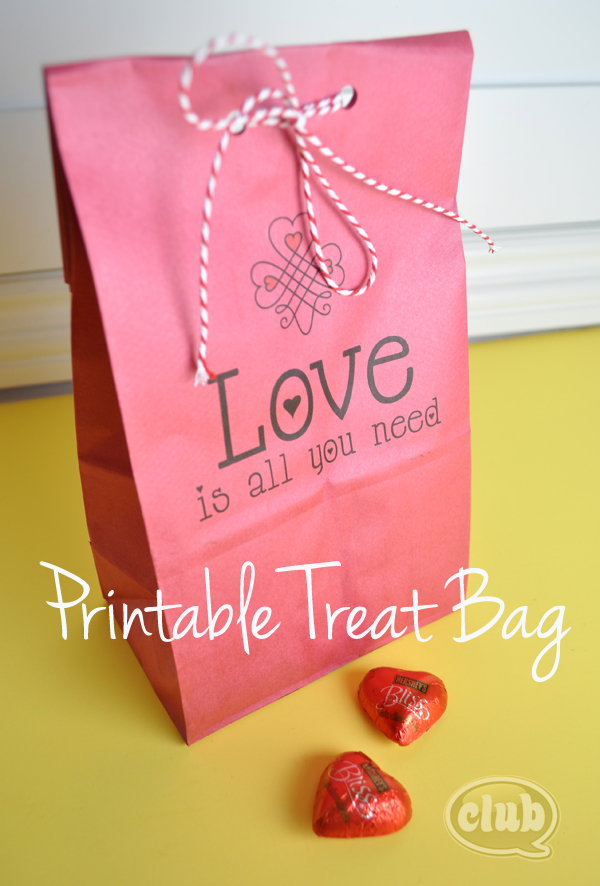
Paper Gift Bag Printable with Love

Lunchbag Love printable bag design


Then you can fill your bags with yummy chocolates for a quick and easy Valentines gift bag idea:

Valentines printable paper bag

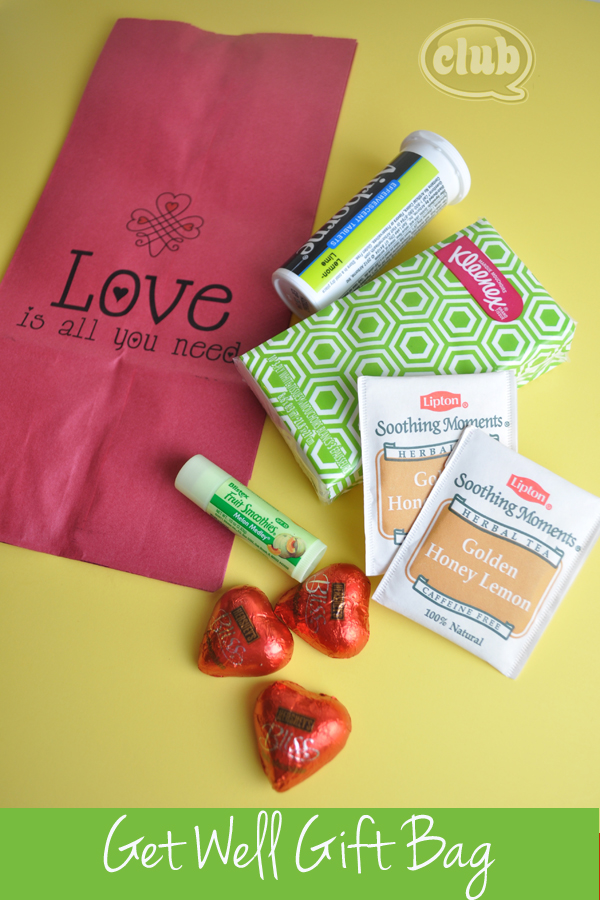
Or, for a great “Get Well Soon” gift bag idea, fill it with a few things that might make getting over a cold a little easier. My suggestions after this week are, tissues, chapstick, Airborne, soothing tea, and of course, chocolate. You can’t ever go wrong with chocolate. = )

Get Well Gift Bag Idea

After filling your bag, you can fold over the top, punch a couple holes a the top and tie with with a pretty ribbon or string. Lovely!

Printable treat paper bag

Enjoy printing your own treat bags, and I am wishing all of you good health, happiness, and love.

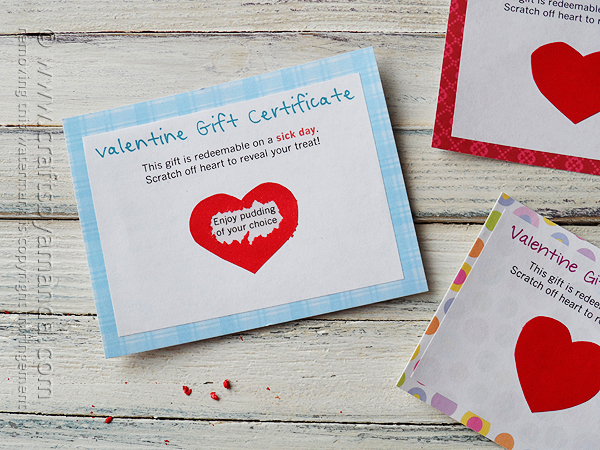
Looking for another clever trick? These homemade scratch off Valentines are so crafty from Crafts by Amanda!

scratch-off-valentines-craft for kids

Happy crafting!


If you liked this post, and want more, you can subscribe to be on our mailing list here.

If you liked this post and want more, you can subscribe to be on our mailing list and make sure to get your free Cupcake Toppers Printables for Every Occasion.

  54 comments for “Printing on Paper Bag Ideas with Free Printable

  1. January 25, 2013 at 11:25 am

    You are a genius!!!

    • January 26, 2013 at 8:10 am

      I tell my sister that all the time – but she doesn’t listen to me. Thank you for commenting!

  2. Libby
    February 11, 2013 at 9:39 pm

    Thank you so much for this! I’ve been searching for ideas for wedding favors and this is perfect. It’s cost effective and personal. Super cute! We could easily put our names and wedding date with some stars around the words.

    • February 12, 2013 at 8:23 am

      sounds lovely! That’s sounds perfect for wedding favors.

  3. Pingback: Dollar Store Crafts » Blog Archive » Make Printed Paper Bags
  4. February 13, 2013 at 8:28 am

    This is one of the greatest ideas ever! Where did you get your white bags? Have you tried printing on the brown lunch bags? I’m going to go try this right now.

    • February 13, 2013 at 8:34 am

      I purchased the white bags at my local Michaels and the red ones at Target. Hope that helps. Happy crafting!

  5. Danielle
    February 14, 2013 at 2:27 am

    I have a ton of bags that are left over from a project now I can do something with them!

  6. Tracie
    February 20, 2013 at 8:16 pm

    Adorable. I have done this before and people love it. I just need your cute artwork. Also printed scavenger hunt list on bags for kindergarten scavenger hunt. I love these bags. There are a million ideas for them.

    • February 21, 2013 at 6:15 am

      Thanks for the great comment Tracie. Fabulous ideas on how to use this technique!

  7. Leen
    February 23, 2013 at 8:07 am

    Yes! This was my “go to” every time I was snack mom. Slap a fave football, baseball, basketball team or player and voilà! Cool mom status!

  8. Gyana
    March 6, 2013 at 7:42 pm

    ugh… I love this idea sooo much. My printer isn’t as crazy about it. I can’t get it to feed???… dunno what I am doing wrong. I did the measurements… fed it properly…but, it wouldn’t take it…. please help!!

    Signed,
    Trying to be a really cool mom…for sons 1st birthday party!! 🙂

    • March 7, 2013 at 9:10 am

      First of all Gyana, you are definitely a cool mom already. = )
      Did you make sure to make a custom print size in your printer settings first, by chance?

    • Sarah
      June 17, 2013 at 3:28 pm

      I put my printer settings for the 5×8 index card, and that worked in my printer. I think letting the printer know that the bag is thicker than normal paper helps in the printing process. Hope this helps!

  9. Mimi
    March 10, 2013 at 11:36 am

    What would be great is a printable like this but for Easter, can’t find any on line. Lunch bags are a great size for Easter goodies.
    Thanks, love ur website.

  10. Lucy Lou
    March 19, 2013 at 2:46 pm

    I can’t find where you change it to horizontally. I went to orientation and it does not give me that option. Mine just gives portrait or landscape. Please HELP. My printer did not like my bags. I changed settings for the size of my bags under custom.

    • March 20, 2013 at 9:48 am

      Hi Lucy,
      I just updated the Spring paper bag printing post with a visual example.
      Check it out here, and let me know if this makes it clearer:
      https://club.chicacircle.com/spring-and-easter-paper-bag-printing-ideas-with-free-printables/

      • Pauline
        November 28, 2013 at 5:36 pm

        Not all printer setting comes with ‘invert orientation’ features =(

        mine only comes with landscape or portrait..

    • donna
      May 13, 2014 at 2:12 pm

      Portrait is vertical as in upright, landscape is horizontal as in lengthwise…hope that helps

    • Cheryl
      October 26, 2014 at 8:36 pm

      Horizontal is landscape.

  11. Lucy Lou
    March 20, 2013 at 12:41 pm

    Ok, I figured out how to print the correct direction, but my printer will not feed the bags. I changed the settings for custom and it will not feed and always tell me paper jam. I was trying to do something on brown paper bags for my daughters Bachelorette party as a survival kit. Need help yesterday, please!!!!!!

  12. Kate
    April 3, 2013 at 3:14 pm

    I have to confess, I’m pretty sure I broke my printer doing this over the weekend. My hubby isn’t too happy, and asked if I was putting things in the printer that shouldn’t have been in there. I love the idea (and the bags that I got done before it broke were really cute), but I think next time I’ll stick to using sharpie, or printing on sticker paper and then applying it. Just a warning to anyone who may not be prepared to throw their photo printer in the trash!

  13. brooke
    April 14, 2013 at 6:57 pm

    In order to prevent headache and/or printer damage, you will want to make sure you change the paper setting. Most printers will have a setting for thick paper such as envelopes or card stock. The feeder will actually open further to allow for the larger media. Hope this helps!

    • April 14, 2013 at 6:58 pm

      Great tip Brooke. Thanks for that helpful advice.

  14. Janice
    May 6, 2013 at 2:11 pm

    I tried to do this but treat bags seem to be glossy.
    The ink was wet and the image came out horrid.
    Any suggestions? Also tried setting the paper to “Glossy photo paper” to see if it would work but no luck.

    • May 8, 2013 at 9:17 am

      Hi Janice,
      Sorry you were having so much trouble. Make sure to purchase bags that don’t have the glossy finish. Make sure they are uncoated so that the ink has something to stick to.

  15. Tricia
    May 26, 2013 at 6:49 pm

    Are you using a laser or inkjet printer??

  16. MArilyn J
    June 14, 2013 at 1:06 pm

    TIP: do a test print to see which way your printer feeds. Mine fed opposite from the directions above. Also – You may need to temporarily tape the flap down so that it doesn’t get stuck in your printer. the first one got stuck and then i taped the flap down with some low-tack tape. It worked perfectly!

  17. Crafteechic
    June 27, 2013 at 10:27 pm

    What brand of printer do u suggest? Awesome idea. I can’t wait to print bags for my students!!

    • June 28, 2013 at 12:08 pm

      I use an HP inkjet 6500 printer to print my bags. Have fun!

  18. Jessica
    July 1, 2013 at 3:31 pm

    Hi, I was wondering if a printer will feed a brown gift bag with handles?

    • September 17, 2013 at 10:59 am

      no, I wouldn’t feed any bags with handles through the printer.

  19. Missy
    July 25, 2013 at 8:13 pm

    I’ve tried this on regular paper lunch bags. I wouldn’t recommend trying it. I’m guessing that a heavier-weight lunch bag, like the ones pictured, feed through printers much easier. I’m a little bummed because this would have been super cool for our VBS send-home bags! Thanks for posting this! Your bags are adorable!!!

  20. Leanne
    August 19, 2013 at 9:40 pm

    This is an awesome idea! Have you ever tried printing on paper bags with handles??? I bought these cute coloured kraft gift bags, but they have the twisted paper handles and I’m afraid to even try them in my printer (Canon)…do you think this could even work???

    • August 19, 2013 at 9:53 pm

      Hmmmm… I wouldn’t try printing on them with the handles. I think that would just jam up the printer, sorry.

  21. Odalys
    September 17, 2013 at 7:36 am

    Do you have to make the image upside down on your printer before you print??

    • September 17, 2013 at 10:58 am

      Yep, in your printer settings, make sure to flip the image horizontally so that when it comes out, it will be right reading.

  22. Tammy P.
    November 12, 2013 at 5:31 am

    Absolutely love this! This is the best idea ever. Thanks for the info. God bless.

  23. Christy
    November 25, 2013 at 6:28 pm

    Thanks for this idea. I used it to make gift bags for my daughter’s 5th birthday. All the parents were surprised to find out I made them myself.

  24. Kendra
    February 7, 2014 at 9:55 am

    Has anyone tried this on a color laser jet printer? That is what I have and don’t want to ruin it before I do this. I have ran envelopes through it before with no problem, cardstock as well.

  25. karen dickson
    February 25, 2014 at 3:18 pm

    fantastic thanks for sharing just got to get me some bags now 🙂

  26. Crissy
    March 27, 2014 at 8:30 pm

    Could you please tell me what model and brand printer you used? I am in the market for a new one, and I want to be sure it can do this type of project. Thanks in advance!

    • March 28, 2014 at 6:12 am

      Hi Crissy, I use an all-in-one HP 6500 inkjet printer.

  27. Emily
    April 24, 2014 at 8:21 am

    I was going to make little tags for my daughters treat bags for her birthday, but then remembered that I had pinned this and after a few tries, it worked perfectly!! Much less work and they turned out great. THANK YOU!

  28. Bernadette
    October 6, 2014 at 11:16 am

    I love youyr blog.. very nice colors & theme. Did you make this
    website yourself or did you hire someone to do it for you?
    Plz reply as I’m looking to construct myy own blog and
    would lie to know where u goot thiis from. appreciate it

    • October 20, 2014 at 9:42 am

      Hi Bernadette,
      I designed all of the graphics, but I used the magazine premium wordpress theme as a template.
      Hope that helps! Good luck with everything. Hope you are following along on our Creative Blog Talk series.

  29. October 21, 2014 at 2:51 pm

    Thank you so much for this post/tutorial. I have always wanted to print on sacks. Crossing fingers.
    Found this on Pinterest, Fabulous photos.

  30. October 23, 2014 at 11:03 am

    My area of expertise lie more in soap, candles and jewelry currently but I’ve been racking my brain trying to figure out how to put my logo onto bags for craft fairs and shows. This is perfect!

    I wanted to be able to make it myself but wasn’t sure of the best way to accomplish what I had in mind. I had considered making my own stamps with my logo or just using labels but this is perfect. Thank you so much.

  31. July 26, 2015 at 7:18 pm

    This is such a clever and frugal idea that I *know* I’ll find a use for. Thank you!

  32. Jennifer
    November 14, 2015 at 6:32 am

    Thank you for this! We were looking for something cute (and inexpensive) for the nurses during my mom’s recent hospital stay. Added some items (lifesaver, marble, candle, snickers, starburst, button, lollipop, mint, tootsie roll, gum, paper clip, and rubber band) with sayings in relation to nursing. This made is super easy to create an assembly line (that even my 3 year old niece could help with)

Comments are closed.